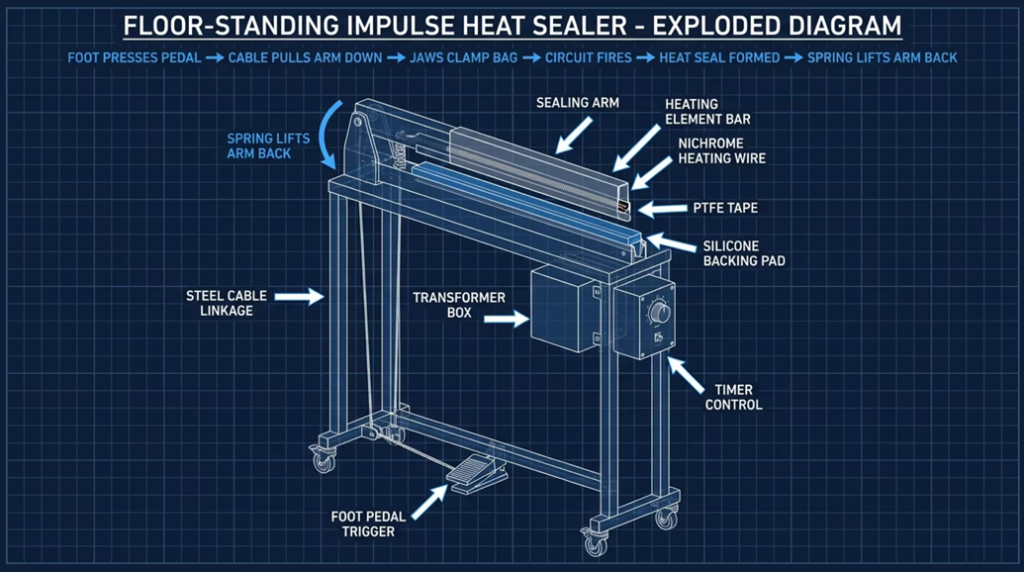
A floor-standing foot pedal heat sealer (also called a pedal impulse sealer or treadle sealer) is fundamentally different from a
tabletop hand sealer in both form and function. Rather than sitting on a workbench and being pressed by hand, this machine
stands independently on a four-legged steel frame at working height, with the sealing arm at chest or waist level and a foot
pedal at floor level — connected by a steel cable or mechanical linkage running up the frame.
What It Looks Like (The Real Machine)
The machine consists of three distinct physical zones:
Lower zone — the stand frame: Four steel legs (often with castors/wheels for repositioning) provide a stable floor-standing
base. The foot pedal sits at floor level, typically hinged to the lower frame rail.
Middle zone — the sealing head: A horizontal sealing arm is mounted at adjustable working height (typically 80–110cm
from floor). The upper jaw contains the nichrome heating wire element and PTFE tape; the lower fixed jaw has the silicone
rubber backing pad.
Upper/side zone — the control box: The transformer and timer circuit board are housed in a box mounted on the frame or
sealing head, with a dial or digital panel accessible to the operator.
The Complete Sealing Cycle
Step 1 — Foot Depression The operator presses the floor pedal downward with their foot. A steel cable (or rigid rod linkage on
heavy-duty models) transmits this downward force up through the stand frame to the pivot point of the sealing arm. The
sealing arm rotates downward, pressing the upper heated jaw firmly against the lower silicone backing pad — clamping the
bag film between them at 15–30 kg of consistent mechanical pressure.
Step 2 — Circuit Closure & Heat Pulse As the jaws make contact (or at a set pressure threshold), a microswitch closes the
secondary low-voltage circuit through the transformer. Current flows through the nichrome (Ni80/Cr20) resistance wire,
generating heat via Joule effect. The wire reaches 150–220°C within 0.3–1.0 seconds depending on the timer setting and film
type. The PTFE tape covering the wire distributes heat evenly and prevents molten film from sticking to the element.
Step 3 — Seal Formation & Cooling Dwell The film layers melt and fuse under simultaneous heat and clamping pressure —
polymer chains from both film layers diffuse across the interface, forming a bond stronger than the surrounding unmelted film.
The jaws remain clamped for the full timer-set dwell period (heating + cooling phase) before the operator releases the pedal.
Releasing too early — while the seal is still molten — causes peeling or deformation.
Step 4 — Spring Return Releasing the foot pedal allows the return spring (or gas strut) to lift the upper jaw back to the open
position. The nichrome wire instantly cools to ambient — this is the core advantage of impulse sealing: zero heat between
cycles, safe to touch, zero standby energy draw